Web Hosting
Detailed Web Hosting notes with clear explanations, real-life examples, diagrams, visual illustrations, step-by-step procedures, practical activities and an interactive exam system.
1. Introduction to Web Hosting
Web hosting is a service that provides the storage, computing resources and network connection needed to make a website or web application available to users over the internet. Website files such as HTML, CSS, JavaScript, images, videos and server-side application files are stored on a hosting server.
When a visitor enters a website address in a browser, several processes take place. The domain name is resolved to the appropriate server address, the browser connects to the server, and the server returns the requested web resources to the visitor.

Why Web Hosting Is Important
- Website availability: hosting makes website files accessible to users through the internet.
- Storage: the server stores the files and other resources required by the website.
- Server processing: hosting can provide the computing environment required by dynamic websites and applications.
- Database support: many hosting services provide databases for websites that store users, products, posts or other information.
- Email and other services: some hosting plans provide additional services such as email accounts, backups and security tools.
Basic Web Hosting Process
                     VISITOR
                        |
                    [BROWSER]
                        |
                  [DOMAIN NAME]
                        |
                     [DNS]
                        |
                 [HOSTING SERVER]
                    /        \
            [WEBSITE FILES] [DATABASE]
                        |
                  WEB RESPONSE
                        |
                     BROWSER
2. Types of Web Hosting
Different hosting arrangements provide different levels of resources, control, scalability and administration. The appropriate choice depends on the website size, expected traffic, technical requirements and available budget.
Shared Hosting
Several websites use resources on the same physical server. It is commonly suitable for small websites because it is generally simple to manage and relatively affordable.
Example: A small business information website.VPS Hosting
A Virtual Private Server provides an isolated virtual environment with more control and dedicated resource allocations than typical shared hosting.
Example: A growing web application requiring more server control.Dedicated Hosting
A customer uses an entire physical server rather than sharing that server with unrelated websites. It can provide substantial control and resources.
Example: A demanding organization requiring dedicated infrastructure.Cloud Hosting
Website services can run across a pool of interconnected computing resources. This can support flexible scaling and resilience depending on the provider's design.
Example: A website with changing traffic requirements.Hosting Comparison
| Type | Main Characteristic | Suitable Example |
|---|---|---|
| Shared | Multiple websites share server resources. | Small website or portfolio. |
| VPS | Virtual server environment with increased control. | Growing web application. |
| Dedicated | One customer uses the physical server. | Resource-intensive service. |
| Cloud | Uses a pool of interconnected infrastructure. | Scalable online service. |
3. Domains and DNS
A domain name is a human-readable name used to access a website, while DNS (Domain Name System) helps translate domain names into the addressing information needed to locate internet services.
Common DNS Records
| Record | Purpose | Example Use |
|---|---|---|
| A | Maps a domain or hostname to an IPv4 address. | Pointing a website hostname to a server. |
| AAAA | Maps a hostname to an IPv6 address. | Providing IPv6 addressing for a website. |
| CNAME | Creates an alias pointing to another hostname. | Using www as an alias for another hostname. |
| MX | Specifies mail servers for a domain. | Directing domain email to a mail service. |
| TXT | Stores text information used by various services. | Domain verification or email-security information. |
Step-by-Step: Creating a Domain in cPanel
This procedure demonstrates how a registered domain can be added to an existing cPanel hosting account. cPanel itself does not normally register or renew a domain; those actions are handled by the domain registrar or hosting provider. The exact options shown depend on the hosting provider.
Example Screenshot: Create a New Domain
This example shows the domain field, document-root option and Submit button. Your hosting provider's current cPanel interface may look different.
- Register or obtain the domain: for example, schooldemo.com .
- Log in to cPanel: use the hosting credentials supplied by your provider.
- Open Domains: select Domains from the cPanel dashboard.
- Click Create a New Domain: this opens the domain-creation form.
- Enter the domain: type the fully qualified domain name, for example schooldemo.com .
- Choose the document root: for a separate website, use a separate document-root folder when your provider permits it. A common example is public_html/schooldemo.com .
- Submit: click Submit and confirm that the domain appears in the Domains list.
- Configure DNS: use the nameservers or DNS records supplied by the hosting provider.
- Wait for DNS propagation: DNS changes may take time to become visible to all resolvers.
- Verify the document root: make sure you know exactly which folder will contain the website files.
Creating and Connecting a Domain
    REGISTERED DOMAIN
           |
           v
    [ADD DOMAIN IN CPANEL]
           |
           v
    [DOCUMENT ROOT]
           |
           v
    [UPLOAD WEBSITE]
           |
           v
    [DNS POINTS TO HOST]
           |
           v
    [LIVE WEBSITE]
Step-by-Step: Connecting a Domain to Hosting
4. Web Servers
A web server is software, and commonly the computer or virtual machine running that software, that accepts web requests and returns web resources to clients. Common web-server software includes Apache and Nginx.
Apache
A widely used web-server platform that can serve static websites and support dynamic web applications through suitable modules and integrations.
Nginx
A high-performance web server and reverse proxy commonly used to serve websites and handle HTTP/HTTPS traffic.
Application Runtime
Some websites require a runtime such as PHP, Node.js or another supported server-side environment to execute application code.
Database Server
Stores structured application data such as user accounts, products, articles and transactions.
Web Server Request Flow
    [BROWSER]
        |
     HTTP / HTTPS REQUEST
        |
    [WEB SERVER]
        |
        +---- Static file ----> HTML / CSS / JS / IMAGE
        |
        +---- Application ----> SERVER-SIDE CODE
                                  |
                               [DATABASE]
                                  |
                             APPLICATION RESPONSE
                                  |
                             [WEB SERVER]
                                  |
                               BROWSER
5. Step-by-Step: How to Host a Website on a Server
This practical procedure demonstrates how to take a website created on your computer and publish it on a typical cPanel web-hosting server . The exact appearance of a hosting control panel can differ between hosting companies, but the main process is similar. cPanel documentation identifies public_html as the web root commonly used for the main domain, while some additional domains can have their own document-root folders. citeturn1search0turn0search8
What You Need Before Starting
- A completed website on your computer.
- A web-hosting account with access to a server.
- A domain name, or a temporary hosting address supplied by the host.
- cPanel access, if the hosting company uses cPanel.
- The correct website files and folders.
- Internet access for connecting to the hosting server.

Step 1: Prepare and Test the Website on Your Computer
Before uploading anything, open the website locally and check that the homepage, navigation, images, CSS and JavaScript work correctly. This prevents you from uploading a website that already contains broken links or missing files.
Example Website Folder Before Upload
    schoolwebsite/
    ├── index.html          ← MAIN HOMEPAGE
    ├── about.html
    ├── contact.html
    ├── css/
    │   └── style.css
    ├── js/
    │   └── script.js
    └── images/
        ├── logo.png
        └── banner.jpg
Step 2: Log In to Your Hosting Control Panel
Use the login details supplied by your hosting provider to enter the hosting control panel. If the provider uses cPanel, you will normally see management areas for files, domains, databases, email and other services.
- Open your hosting provider's customer or control-panel login page.
- Enter your username and password.
- Complete any security verification or two-factor authentication required.
- Open the cPanel dashboard.
Step 3: Open File Manager
In cPanel, locate the Files section and click File Manager . File Manager provides a browser-based way to manage files and folders on the hosting account. citeturn0search0
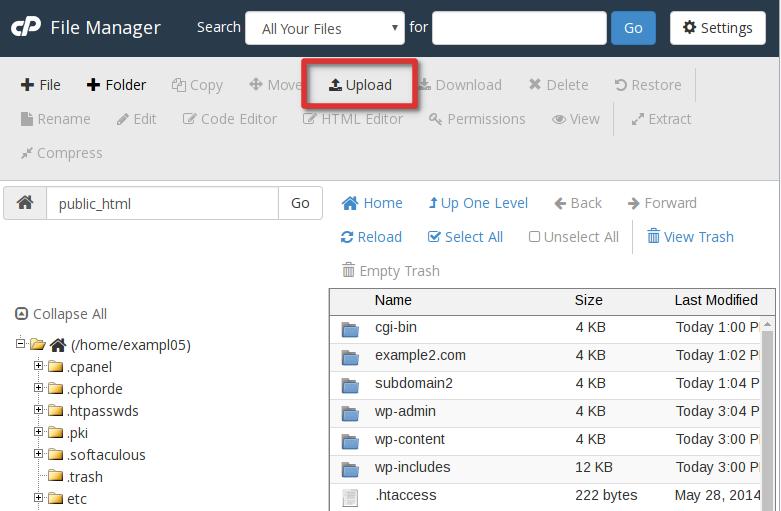
Step 4: Open the Website's Web Root
For the main domain in a common cPanel setup, open public_html . This is the directory from which files for the main website are commonly served. cPanel describes the Web Root as public_html or www and allows a domain to have a specific document root. citeturn0search0turn0search8
Step 5: Compress the Website into a ZIP File
If your website contains many files and folders, compressing the site into one ZIP archive is usually easier than uploading every file separately. cPanel File Manager supports uploading compressed files and extracting them on the server. citeturn0search0
On your computer, right-click the website folder and choose the operating system's compression option. The result might be something like schoolwebsite.zip .
Before and After Compression
    BEFORE:
    SchoolWebsite/
       index.html
       about.html
       css/style.css
       js/script.js
       images/logo.png

    AFTER:
    SchoolWebsite.zip   ← ONE FILE TO UPLOAD
Step 6: Upload the ZIP File to the Server
With public_html open, click Upload . Select the ZIP file from your computer or drag it into the upload area. Wait until the upload finishes completely before leaving the page. cPanel's File Manager supports uploading files, while a folder itself cannot be uploaded directly through that interface; a ZIP archive can instead be uploaded and extracted. citeturn0search0
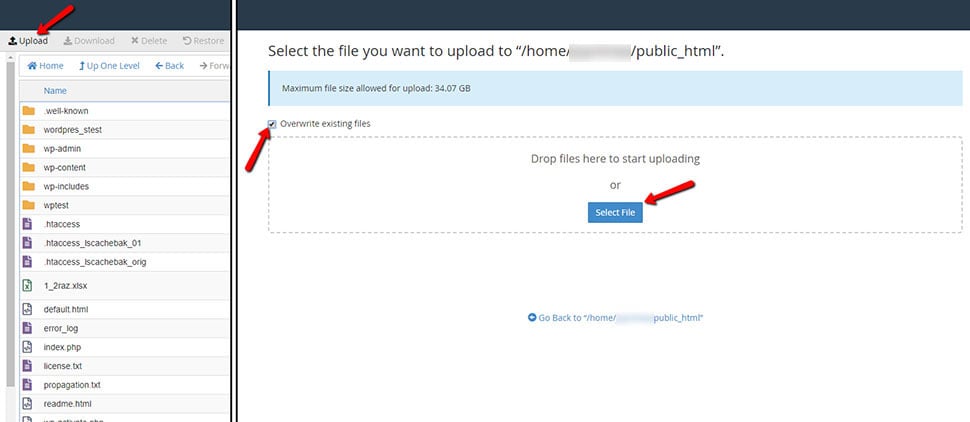
Step 7: Extract the Website ZIP File
Return to the public_html directory after the upload finishes. Select or right-click the ZIP file and choose Extract . cPanel supports extracting ZIP archives when the required server support is available. citeturn0search0
- Locate schoolwebsite.zip .
- Select the archive.
- Click Extract .
- Confirm the extraction location.
- Check that index.html , CSS, JavaScript and image folders are present.
- Delete the ZIP archive after confirming the extraction, if it is no longer needed.
Step 8: Check the Website Files and Folder Structure
After extraction, confirm that the structure is correct. For a simple main-domain static website, the result should look similar to this:
Correct Server Structure
    public_html/
    ├── index.html       ← HOMEPAGE
    ├── about.html
    ├── contact.html
    ├── css/
    │   └── style.css
    ├── js/
    │   └── script.js
    └── images/
        ├── logo.png
        └── banner.jpg
If the homepage is buried inside an extra folder, the domain may not display it as expected. Check the hosting provider's document-root arrangement before moving files.
Step 9: Connect the Domain to the Hosting Server
Uploading files alone does not always make a custom domain work. The domain must point to the hosting service using the DNS configuration required by the hosting provider. The exact records depend on the provider and hosting setup.
- Find the DNS or domain-management instructions provided by your host.
- Identify whether the provider requires nameservers or particular DNS records.
- Enter the required DNS configuration at the domain provider.
- Wait for the DNS change to become effective.
- Test the domain in a browser.
Step 10: Open the Website in a Browser
Enter the domain in the browser. If the DNS and hosting configuration are correct, the browser should request the homepage from the hosting server.
Step 11: Install or Enable HTTPS
After the website is working, enable HTTPS using the certificate system provided by your hosting company or another suitable certificate service. Let's Encrypt provides free automated certificates, although the exact installation process depends on the hosting environment. citeturn0search12
- Open the hosting provider's SSL/TLS or security section.
- Select the domain.
- Request or enable an appropriate certificate.
- Wait for certificate installation to complete.
- Open the website using https:// .
- Check that important pages and resources also load correctly over HTTPS.
Step 12: Test the Hosted Website
Do not assume that uploading the files means the deployment is complete. Test the complete website from the browser.
| Test | What to Check | Expected Result |
|---|---|---|
| Homepage | Open the domain. | Homepage loads correctly. |
| Navigation | Click menu links. | Correct pages open. |
| Images | Check all images. | Images display without broken-image icons. |
| CSS | Check page appearance. | Styles are applied correctly. |
| JavaScript | Test buttons and interactions. | Required functions work. |
| HTTPS | Open the HTTPS address. | Secure connection works. |
| Mobile | Test a narrow screen. | Layout remains usable. |
Complete Hosting Process
Practical Exercise: Host a Student Website
Task: Create a small three-page website and publish it on a test hosting account.
- Create index.html , about.html and contact.html .
- Create a CSS folder and an images folder.
- Test the website locally.
- Compress the website into a ZIP file.
- Log into the hosting control panel.
- Open File Manager and locate the correct document root.
- Upload and extract the ZIP file.
- Check the file structure.
- Connect or verify the domain/DNS configuration.
- Open the website in a browser and test every page.
- Enable HTTPS where supported.
- Record the steps followed and any problems encountered.
6. Uploading a Website to a Hosting Server
Website deployment involves moving the website files from a development computer to the hosting environment and ensuring that the server is configured to serve them correctly.
Files Commonly Uploaded
- HTML files: provide the structure and content of pages.
- CSS files: control presentation, layout and appearance.
- JavaScript files: provide client-side interaction and functionality.
- Images and media: provide visual and multimedia content.
- Server-side files: provide application processing when the hosting environment supports them.
Step-by-Step: Create an FTP Account in cPanel
An FTP account provides controlled access to website files. cPanel allows an account to be limited to a particular directory. This is preferable to giving a user unnecessary access to the entire hosting account.

Example Screenshot: FTP Accounts
The example shows Login, Password, Directory, Quota and Create FTP Account fields.
- Log in to cPanel.
- Open FTP Accounts under Files .
- Enter a username such as website .
- Select the correct domain.
- Generate a strong password.
- Set the FTP account's directory to the website's document root, for example public_html/schooldemo.com , when appropriate.
- Choose a quota if required.
- Click Create FTP Account .
- Store the FTP connection details securely.
Step-by-Step: Connect to the Server with FileZilla
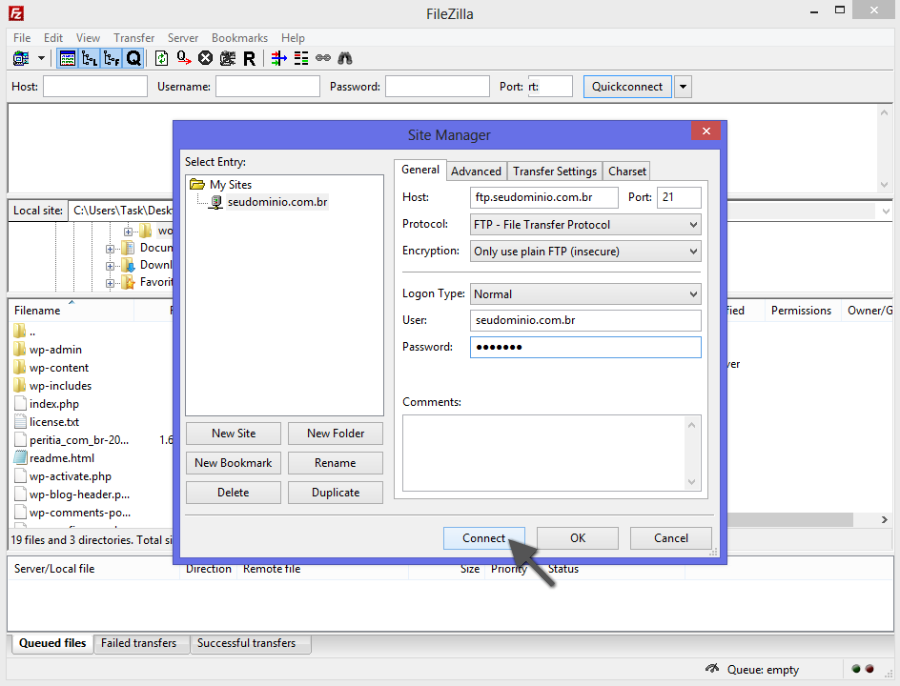
Example Screenshot: FileZilla Site Manager
The example shows the Host, Port, Protocol, Username and Password fields. Use the secure connection method specified by your hosting provider.
- Install and open FileZilla or another supported FTP/SFTP client.
- Open Site Manager and create a new site profile.
- Enter the server hostname supplied by the hosting provider.
- Enter the FTP username created in cPanel.
- Enter the FTP password.
- Select the secure connection method supported by the host. Prefer SFTP or FTP over TLS/FTPS where available.
- Enter the port specified by the host. Port 21 is conventional for FTP/FTPS; SFTP commonly uses 22, but your provider may use another port.
- Click Connect .
- Check that the remote directory is the correct website document root.
Step-by-Step: Upload the Website Through FTP
- In FileZilla, use the left side to locate the website folder on your computer.
- Use the right side to open the website's document root on the server.
- Select index.html , CSS, JavaScript, image folders and any required PHP files.
- Drag the selected files from the local side to the remote side.
- Monitor the transfer queue until the files are transferred successfully.
- Open the remote directory and confirm the same folder structure exists.
- Open the domain in a browser and test the website.
FTP Upload Process
    [YOUR COMPUTER]
          |
          | Secure FTP / SFTP
          v
    [FILEZILLA]
          |
          v
    [HOSTING SERVER]
          |
          v
    [WEBSITE DOCUMENT ROOT]
          |
          +-- index.html
          +-- css/
          +-- js/
          +-- images/
          +-- PHP files
Step-by-Step Website Upload Procedure
- Prepare the website: test the website locally and check that links, images and scripts work.
- Organize the files: keep HTML, CSS, JavaScript, images and other resources in the correct folders.
- Access the hosting account: use the hosting control panel, file manager or an appropriate file-transfer method.
- Open the web root: locate the directory configured to contain the public website files.
- Upload the files: transfer the website files while maintaining the required folder structure.
- Check the default page: confirm that the appropriate homepage file is present and correctly named.
- Test the domain: open the domain in a browser and test all important pages.
- Correct errors: investigate missing files, incorrect paths, permissions or server configuration problems.
7. Hosting Control Panel
A hosting control panel provides a graphical interface for managing common hosting tasks. Depending on the hosting provider, the available features may include file management, domains, databases, email, backups, security and software configuration.

Hosting Dashboard
A control interface can bring common hosting management functions together in one place.

Website Files
Hosting file managers allow administrators to organize website files and folders on the server.
Common Control-Panel Tasks
File Management
Upload, download, rename, move and remove website files.
Domain Management
Add domains and configure domain-related hosting settings.
Database Management
Create databases and database users and manage supported database services.
Backups
Create or restore backups where the hosting plan provides the feature.
8. Website Files and Databases
Static websites may consist mainly of HTML, CSS, JavaScript and media files. Dynamic websites often also use server-side code and databases to generate or store changing information.
Typical Website Structure
    website/
    ├── index.html
    ├── about.html
    ├── contact.html
    ├── css/
    │   └── style.css
    ├── js/
    │   └── script.js
    ├── images/
    │   ├── logo.png
    │   └── banner.jpg
    └── uploads/
Database Example
A database can store information that should not be hard-coded into every webpage. For example, a school website might store student records, announcements or user accounts in structured database tables.
9. PHP and MySQL: Creating a Database and Connecting PHP
Dynamic websites can use PHP to process requests and MySQL to store structured information. The PHP application connects to the database using the database host, database name, database username and password supplied by the hosting environment.
Part A — Create a MySQL Database
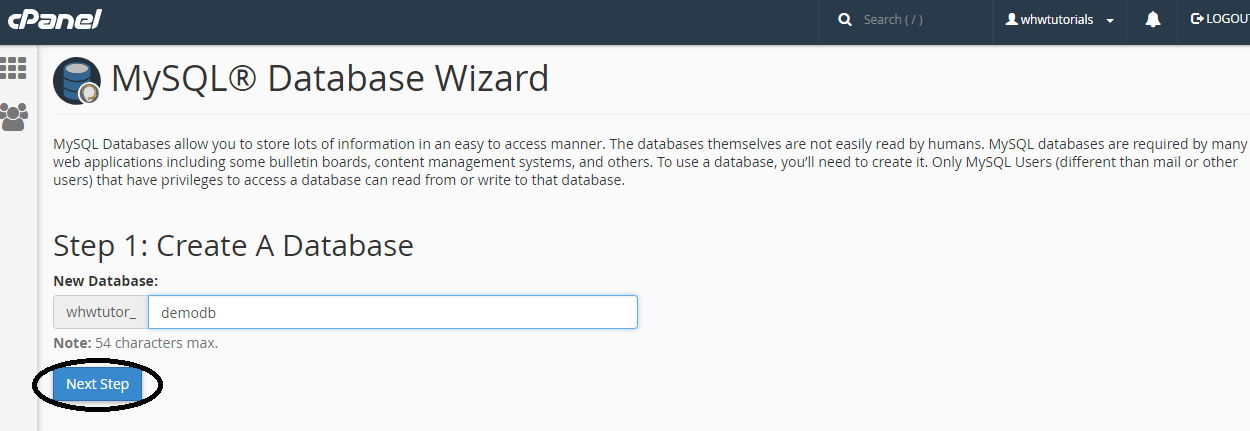
Example Screenshot: MySQL Database Wizard
The screenshot illustrates the first stage of creating a database. Current cPanel versions may label this tool Database Wizard.
- Log in to cPanel.
- Open Database Wizard or MySQL Database Wizard under Databases .
- Enter a database name such as sakim_web .
- Click Next Step .
- Create a database user such as sakim_user .
- Generate a strong database password and keep it private.
- Click the button to create the user.
- Assign the user to the database.
- Select the privileges the application actually requires.
- Finish the wizard.
- Record the exact database name and username displayed by cPanel, including any automatic account prefix.
Part B — Import the Database Tables
- Open phpMyAdmin from cPanel.
- Select the database you created.
- If you have an SQL backup file, choose Import .
- Select the SQL file and start the import.
- Wait for the import to complete.
- Confirm that the required tables appear.
Part C — Connect PHP to MySQL
Create a PHP configuration file such as config.php . The following is a teaching example. Replace the placeholders with the real values from your hosting account.
Example PHP Database Connection
    <?php

    mysqli_report(MYSQLI_REPORT_ERROR | MYSQLI_REPORT_STRICT);

    $dbHost = "localhost";
    $dbUser = "CPANELPREFIX_sakim_user";
    $dbPass = "YOUR_DATABASE_PASSWORD";
    $dbName = "CPANELPREFIX_sakim_web";

    $db = new mysqli($dbHost, $dbUser, $dbPass, $dbName);
    $db->set_charset("utf8mb4");

    echo "Database connection successful.";

    ?>
PHP's mysqli extension provides the connection interface used in this example. PHP documentation shows that the connection accepts values including hostname, username, password and database name.
Part D — Test the PHP Connection
- Upload config.php to the server.
- Create a temporary db-test.php page that includes the connection file.
- Open the test page through the website domain.
- If the connection succeeds, confirm that the success message appears.
- If it fails, check the database host, database name, database username, password and user privileges.
- Check the PHP version and ensure the mysqli extension is available in the hosting environment.
- After testing, remove or protect the test page so that it cannot expose database information.
How PHP Connects to MySQL
    [BROWSER]
        |
        | HTTPS request
        v
    [PHP APPLICATION]
        |
        | mysqli connection
        v
    [MYSQL DATABASE]
        |
        | query result
        v
    [PHP APPLICATION]
        |
        | HTML response
        v
    [BROWSER]
10. Web Hosting Security
Web hosting security protects websites, server accounts, applications and stored information from unauthorized access, malicious modification, data loss and service disruption.
Strong Authentication
Use strong, unique credentials and multi-factor authentication where available.
Software Updates
Keep supported server software, applications, themes and extensions updated according to a controlled maintenance process.
Least Privilege
Give accounts only the permissions needed to perform their legitimate tasks.
Backups
Maintain appropriate backups and periodically verify that restoration works.
Security Procedure
- Identify important website files, databases and accounts.
- Identify possible vulnerabilities and unauthorized-access risks.
- Use strong authentication and appropriate access controls.
- Keep the hosting environment and website software maintained.
- Use HTTPS and suitable security controls.
- Monitor logs and unusual activity where the hosting environment permits.
- Maintain and test backups.
- Respond promptly and systematically to security incidents.
11. SSL/TLS and HTTPS
HTTPS is HTTP carried over a secure TLS connection. It helps protect web traffic against unauthorized observation or modification while the connection is being established and used correctly.
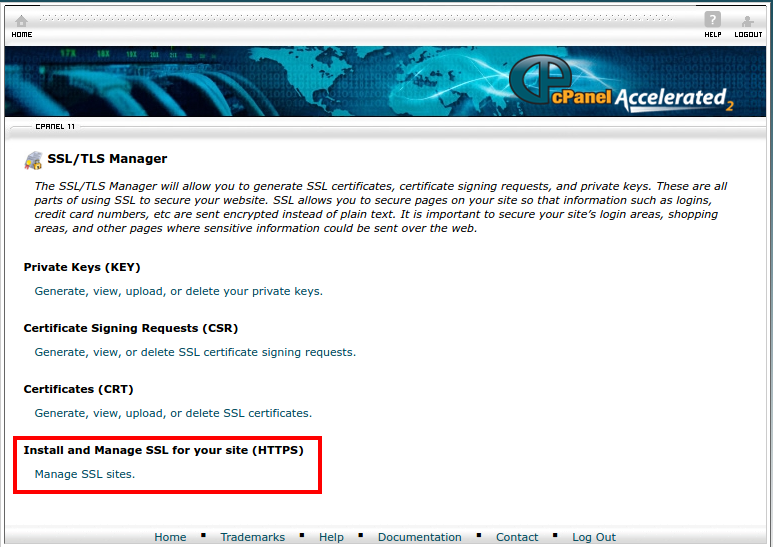
Example Screenshot: SSL/TLS Manager
The screenshot shows the SSL/TLS Manager and Manage SSL Sites option. Current cPanel versions may use a unified SSL/TLS Certificates interface.
Step-by-Step: Installing SSL/HTTPS in cPanel
Most modern shared-hosting environments use an automated certificate system such as AutoSSL . The exact certificate authority and controls depend on the hosting provider.
- Confirm the domain: make sure the domain has been added to the hosting account.
- Confirm DNS: make sure the domain resolves to the correct hosting service.
- Open SSL/TLS: find SSL/TLS or SSL/TLS Certificates under Security.
- Check certificate status: if AutoSSL is enabled, the server may automatically request and install a certificate for the domain.
- Run AutoSSL if available: use the provider's AutoSSL control when it is available for your account.
- Manual installation: if a certificate is supplied manually, use Manage SSL Sites and enter the certificate information as required by the provider.
- Test HTTPS: open https://yourdomain.com .
- Check the certificate: verify that the domain is covered and the certificate is valid.
- Enable Force HTTPS Redirect: after HTTPS works, enable the hosting provider's redirect option where available.
- Test all pages: verify that images, scripts, forms and other resources load correctly over HTTPS.
Basic HTTPS Deployment Process
Why HTTPS Matters
- It helps protect information exchanged between a browser and the website.
- It authenticates the website through certificate-based mechanisms when certificate validation succeeds.
- It is important for protecting login sessions and other sensitive web traffic.
11. Web Hosting Troubleshooting
Web hosting troubleshooting is a systematic process of identifying why a website or hosting service is not behaving as expected, applying an appropriate correction and verifying the result.
Common Problems and Checks
| Problem | Possible Cause | First Checks |
|---|---|---|
| Website not loading | DNS, server, network or configuration problem. | Check domain resolution, hosting status and server response. |
| 404 error | Requested file or route cannot be found. | Check URL, filename, path and application routing. |
| 500 error | Server-side application or configuration problem. | Check application configuration and available server logs. |
| Images missing | Incorrect file path or missing uploaded files. | Check filenames, folders and case sensitivity. |
| Database error | Connection or database configuration problem. | Check database name, credentials and server configuration. |
Detailed Troubleshooting Procedure
- Describe exactly what the visitor sees.
- Determine whether the problem affects one page or the whole website.
- Check the domain and DNS configuration.
- Check whether the hosting server and account are available.
- Check website files, folder structure and file paths.
- Check application configuration and database connectivity when applicable.
- Review relevant server or application logs when available.
- Apply the smallest appropriate correction.
- Test the website again from an appropriate environment.
- Document the cause and solution.
13. Practical Activities
Activity 1: Host a Complete Website
Objective: publish a working website using a domain, cPanel, FTP, PHP/MySQL and HTTPS.
- Prepare and test the website locally.
- Register or obtain a test domain.
- Add the domain to cPanel.
- Identify the domain's document root.
- Create a restricted FTP account.
- Connect using FileZilla through a secure FTP method supported by the host.
- Upload the website files.
- Create a MySQL database and database user.
- Assign the appropriate database privileges.
- Import the application's SQL tables if required.
- Update the PHP configuration with the correct database details.
- Test PHP-to-MySQL communication.
- Install or verify the SSL certificate.
- Enable HTTPS redirect after confirming HTTPS works.
- Test the complete website and document the final result.
Complete Web Hosting Practical
    WEBSITE ON COMPUTER
            |
            v
    ADD DOMAIN IN CPANEL
            |
            v
    CREATE FTP ACCOUNT
            |
            v
    UPLOAD WEBSITE
            |
            +-------------------+
            |                   |
            v                   v
    CREATE MYSQL DB       INSTALL SSL
            |                   |
            v                   v
    CONNECT PHP           ENABLE HTTPS
            |                   |
            +---------+---------+
                      |
                      v
                LIVE WEBSITE
Activity 2: Create an FTP Account
Create a restricted FTP account for a test website. Record the username, directory and connection method without exposing the password.
Activity 3: Upload Through FileZilla
Connect to the test server, upload a complete website and verify that every file and folder appears in the correct document root.
Activity 4: Create a MySQL Database
Use the cPanel Database Wizard to create a database, a database user and suitable privileges. Confirm the database appears in the database management interface.
Activity 5: Connect PHP to MySQL
Create a PHP connection file using mysqli, test the connection and document the cause of any error encountered.
Activity 6: Install and Test SSL
Enable the available SSL certificate for the test domain, verify HTTPS in a browser and test whether all major website resources load correctly over HTTPS.
Activity 7: Full Troubleshooting Exercise
Create one controlled fault such as a wrong document root, missing image, incorrect database password or incorrect DNS setting. Follow the troubleshooting procedure, correct the fault and document the solution.
14. Visual Step-by-Step Server Hosting Guide
Use this section as a practical classroom guide. Each step has an example screenshot beside it. These are real interface screenshots from public hosting/tutorial resources ; cPanel layouts can differ by hosting provider and version. Current cPanel documentation confirms that providers can enable or disable individual interfaces, and the current Domains interface is version-dependent. citeturn0search0turn0search3
A. Creating and Connecting a Domain
Follow these steps to add an already-registered domain to cPanel and prepare its document root.
Step 1: Open cPanel and select Domains
Log in to your hosting account and open the Domains interface. The exact menu can vary because the hosting provider controls which cPanel features are enabled.
Step 2: Click Create a New Domain
Choose Create a New Domain to open the domain creation form.
Step 3: Select Registered Domain
For a domain that you already own, choose Registered Domain when that option is available.
Step 4: Enter the domain name
Type the complete domain name, for example schooldemo.com. Do not add spaces.
Step 5: Choose the document root
For a separate website, use a separate document-root directory when the hosting provider allows it. A common example is public_html/schooldemo.com.
Step 6: Submit the domain
Click Submit or Submit and Create Another. Confirm that the domain appears in the Domains list.
Step 7: Open the document root
Use the domain's Document Root link to open its files in File Manager. cPanel's Domains interface can link directly to the document root.
Example File Manager entry point.
Step 8: Configure DNS
Point the domain's DNS to the hosting service using the nameservers or DNS records supplied by the hosting provider.
Step 9: Wait for DNS propagation
DNS changes may take time to reach different nameservers. Test the domain again after the records have propagated.
Step 10: Verify the website address
Open the domain in a browser and confirm that it reaches the expected hosting account/document root.
Confirm the website files are in the correct document root.
B. Creating an FTP Account
Create a restricted FTP account that can access only the website directory it needs.
Step 1: Open FTP Accounts
In cPanel, open FTP Accounts under the Files section.
Example FTP Accounts interface.
Step 2: Enter the FTP login name
Enter a descriptive username such as website. cPanel may combine it with the selected domain.
Example FTP login field.
Step 3: Select the domain
Choose the domain whose files the FTP account should manage.
Example domain selection.
Step 4: Create a strong password
Enter and confirm a strong password or use the password generator if provided.
Example password controls.
Step 5: Set the directory
Set the FTP account's directory to the website's required folder. Limiting the directory reduces unnecessary access to other files.
Example directory field.
Step 6: Set the quota
Choose an appropriate disk quota if the server supports FTP quotas. Some servers do not support this setting.
Example quota control.
Step 7: Create the account
Click Create FTP Account and confirm that the new account appears in the FTP Accounts table.
Example account creation controls.
Step 8: Record the connection details
Record the FTP hostname, username, password and connection method securely. Never publish the password.
Example connection-information screen.
C. Connecting FileZilla to the Server
Use the FTP/SFTP credentials supplied by the hosting provider and choose the secure protocol supported by the server.
Step 1: Open FileZilla Site Manager
Start FileZilla and open Site Manager so you can create a saved connection profile.
Example FileZilla Site Manager.
Step 2: Create a new site profile
Create a new entry and give it a descriptive name such as School Demo Website.
Example Site Manager profile.
Step 3: Enter the host
Type the FTP/SFTP hostname supplied by your hosting provider.
Enter the server hostname supplied by your host.
Step 4: Choose the secure protocol
Use SFTP or FTP over TLS/FTPS when the hosting provider supports it. Do not assume that every host supports the same protocol.
Example protocol/encryption controls.
Step 5: Enter the port
Use the port supplied by your host. FTP/FTPS commonly uses 21 and SFTP commonly uses 22, but the provider may use a different port.
Example port field.
Step 6: Enter username and password
Enter the FTP account created in cPanel. Keep credentials private.
Example username and password fields.
Step 7: Connect to the server
Click Connect and verify that the remote directory opens successfully.
Example FileZilla connection setup.
Step 8: Open the correct remote folder
Navigate to the website document root before transferring files.
Use the correct document root for the domain.
D. Uploading the Website Through FTP
Transfer the website files from the computer to the correct document root and verify the result.
Step 1: Open the local website folder
In FileZilla's Local site pane, locate the website project on your computer.
Local files appear on the left side in the common FileZilla layout.
Step 2: Open the remote website folder
In the Remote site pane, open the domain's document root.
Remote server files appear on the right side.
Step 3: Select the website files
Select index.html or index.php, CSS, JavaScript, image folders and other files required by the website.
Select the files and folders to transfer.
Step 4: Start the upload
Drag the selected files from the local side to the remote side.
The image shows the equivalent upload concept in cPanel File Manager.
Step 5: Monitor the transfer queue
Wait until the transfer queue shows successful transfers and investigate failed transfers before testing the site.
Check successful and failed transfers.
Step 6: Verify the remote structure
Confirm that the expected folders and files exist in the server's document root.
Use File Manager to verify the server-side structure.
Step 7: Open the live website
Open the domain in a browser and test the home page, links, images, forms and scripts.
E. Creating the MySQL Database and Importing Tables
Use cPanel's Database Wizard to create the database and user, then use phpMyAdmin when an SQL import is required. cPanel recommends Database Wizard for the initial database and user setup. citeturn0search4turn0search6
Step 1: Open Database Wizard
Log in to cPanel and open Database Wizard under Databases. Current cPanel versions use Database Wizard for this workflow.
Example Database Wizard.
Step 2: Enter a database name
Type a short descriptive name such as sakim_web and continue to the next step.
Example database-name step.
Step 3: Create the database user
Enter a database username such as sakim_user and create a strong password.
Example database-user controls.
Step 4: Assign the user to the database
Select the database and user so that cPanel can associate them.
Example database-user association step.
Step 5: Choose privileges
Grant only the privileges the application requires. A typical application may need SELECT, INSERT, UPDATE and DELETE, depending on what it does.
Example privileges step.
Step 6: Finish the wizard
Complete the wizard and record the exact database name and username. cPanel may automatically add an account prefix.
Record the final names exactly as cPanel displays them.
Step 7: Open phpMyAdmin
Open phpMyAdmin from cPanel and select the database you created.
Use phpMyAdmin to manage database contents.
Step 8: Import SQL tables
If your application has an SQL backup, use phpMyAdmin's Import function to load the tables into the selected database.
Import the application's SQL file when required.
F. Connecting PHP to MySQL
The screenshots show the server/file-management context. The actual PHP connection is performed by the code in your PHP application using the database details created in cPanel.
Step 1: Create the PHP configuration file
Create a server-side configuration file such as config.php. Keep real credentials private.
Upload the configuration file only to the required application directory.
Step 2: Set the database host
Use the database hostname supplied by the hosting environment. Many shared-hosting examples use localhost, but you must follow the host's instructions.
The actual database host depends on the server.
Step 3: Enter the database name
Use the exact database name shown in cPanel, including any account prefix.
Use the exact cPanel database name.
Step 4: Enter the database username and password
Use the exact database user and password created in Database Wizard. Never expose the password in HTML or public output.
Use the exact credentials created for the application.
Step 5: Create the mysqli connection
Use PHP's mysqli interface to connect to MySQL/MariaDB, then set the connection character set such as utf8mb4.
The PHP code belongs on the server; this screenshot is a file-management example.
Step 6: Create a temporary database test
Create a protected temporary PHP test page that checks whether the connection succeeds.
Create the test file only for controlled testing.
Step 7: Test the page
Open the test page in the browser and verify that the connection succeeds.
Step 8: Remove the test page
After testing, remove or protect the test page so it cannot expose database information.
Remove temporary diagnostic files after testing.
G. Installing SSL and Enabling HTTPS
Secure the domain after DNS and hosting are working. cPanel's SSL/TLS tools manage certificates, while AutoSSL availability depends on the hosting provider. citeturn0search2turn0search9
Step 1: Confirm the domain is working
Before installing a certificate, confirm the domain is added to the hosting account and DNS points to the correct service.
Step 2: Open SSL/TLS
In cPanel, open SSL/TLS or SSL/TLS Certificates under Security.
Example SSL/TLS interface.
Step 3: Check certificate availability
If your host provides AutoSSL, check whether the certificate is already being issued or installed automatically.
AutoSSL availability depends on the hosting provider.
Step 4: Use AutoSSL when provided
Run or allow the hosting provider's AutoSSL process to request and install an eligible certificate.
The exact AutoSSL controls vary by provider.
Step 5: Use manual installation when required
If you received a certificate from a certificate authority, use the SSL/TLS installation controls provided by the host.
Manual certificate installation is available on supported configurations.
Step 6: Verify HTTPS
Open https://yourdomain.com and check that the certificate is valid for the domain.
Verify the installed certificate.
Step 7: Enable Force HTTPS Redirect
After HTTPS works, use the domain's Force HTTPS Redirect control where the hosting environment provides it.
Step 8: Test the complete website
Check pages, images, CSS, JavaScript, forms and other resources for HTTPS or mixed-content problems.
Complete Picture-by-Picture Workflow
    1. DOMAIN
       ↓
    2. CPANEL DOMAINS
       ↓
    3. DOCUMENT ROOT
       ↓
    4. FTP ACCOUNT
       ↓
    5. FILEZILLA
       ↓
    6. UPLOAD WEBSITE
       ↓
    7. MYSQL DATABASE
       ↓
    8. PHPMYADMIN
       ↓
    9. PHP → MYSQL CONNECTION
       ↓
    10. SSL/TLS
       ↓
    11. HTTPS
       ↓
    12. LIVE WEBSITE
15. Host a Website from Scratch — Complete Beginner Procedure
This lesson starts at the very beginning: switch on the computer → open the browser → find the hosting provider → log in → add the domain → create the FTP account → upload the website → create MySQL → connect PHP → install SSL → test the live website.
1 Start the computer
Switch on the computer and wait for Windows to finish loading. Make sure the computer has an active internet connection before starting the hosting procedure.
 Example browser-opening visual. Your installed browser may be Chrome, Edge, Firefox or another browser.
2 Open the web browser
Click the browser icon on the desktop, taskbar or Start menu. The browser is the program you will use to access the hosting provider, cPanel and the live website.
Example browser interface.
3 Open a search engine
Click the address/search bar at the top of the browser. Type the name of your chosen hosting provider or type a search such as cPanel hosting provider , then press Enter. For a real classroom deployment, use the hosting provider supplied by your institution.
4 Open the hosting provider's website
Select the official hosting provider website. Check the spelling of the address before entering account credentials. Avoid entering passwords into links received from unknown sources.
5 Sign in to the hosting account
Click the provider's Login/Client Area button and enter the hosting username/email and password. Complete any multi-factor authentication requested by the provider.
6 Open cPanel
From the hosting account dashboard, open cPanel if the provider offers cPanel. Some hosts use another control panel, so the exact screen may differ.
7 Find the Domains tool
Scroll to or search the cPanel interface for Domains . This is where a registered domain can be added and its document root managed.
8 Add the registered domain
Click Create a New Domain or the equivalent option. Enter the domain you already own, for example schooldemo.com . Choose a separate document root if this is a separate website and your host supports it.
9 Submit the domain
Review the domain name and document-root settings, then click Submit . Confirm that the domain appears in the Domains list.
10 Configure DNS
Go to the DNS management area specified by your registrar/host. Enter the nameservers or DNS records supplied by the hosting provider. The exact DNS screen depends on where the domain is registered.
11 Wait for DNS to become available
Allow time for the DNS change to propagate. During this period, one network may resolve the new server while another still has older information. Do not repeatedly change records without checking the provider's instructions.
12 Open File Manager
Return to cPanel and open File Manager . Use the domain's document root so the website files are placed in the directory that serves that domain.
Example File Manager interface.
13 Locate the website document root
Find the folder assigned to the domain. For a common cPanel main domain this may be public_html ; an additional domain may have its own directory. Confirm the exact path in the Domains interface.
Example server file structure.
14 Create an FTP account
Return to cPanel → FTP Accounts . Enter a username, select the domain, create a strong password and restrict the directory to the website folder when appropriate.
Example FTP Accounts form.
15 Record FTP connection details
Keep the FTP hostname, username, password and secure connection method in a safe place. Prefer SFTP or FTP over TLS/FTPS when your hosting provider supports it.
Example FTP account settings.
16 Open FileZilla
Install/open FileZilla on the computer. Open Site Manager to create a server connection profile.
Example FileZilla Site Manager.
17 Enter the server host
In FileZilla Site Manager, enter the FTP/SFTP hostname provided by the hosting company.
Example host field.
18 Select the secure protocol
Choose the secure protocol supported by the host, such as SFTP or FTP over TLS. Do not guess if the provider gives specific connection instructions.
Example protocol/encryption controls.
19 Enter port, username and password
Enter the port specified by the host, followed by the FTP username and password created earlier. FTP/FTPS commonly uses port 21 and SFTP commonly uses port 22, but the provider may use different settings.
Example connection fields.
20 Connect to the server
Click Connect . When the connection succeeds, FileZilla displays local files and remote server files.
Example FileZilla connection screen.
21 Open the remote document root
On the remote/server side, navigate to the website document root. Make sure you are not uploading into an unrelated directory.
Example remote-file pane.
22 Find the website on the computer
On the local side, open the folder containing the website. It should contain files such as index.html or index.php , plus CSS, JavaScript and image folders as required.
Example local-file pane.
23 Select the website files
Select all files and folders required by the website. Do not forget folders such as css , js , images or server-side application files.
Example local and remote panes.
24 Upload the files
Drag the selected website files from the local side to the remote side. FileZilla begins transferring them to the server.
Example upload-control visual.
25 Wait for transfers to finish
Watch the transfer queue. Investigate failed transfers instead of assuming the website uploaded completely.
Check the transfer results.
26 Verify the files on the server
Open File Manager or the remote FileZilla folder and verify that index.html /index.php and the required folders are present in the correct document root.
Verify the server-side file structure.
27 Open the database tools
Return to cPanel and locate Database Wizard under Databases.
Example Database Wizard.
28 Create the database
Enter a database name such as sakim_web and continue. cPanel may add an account prefix to the final database name.
Example Database Wizard.
29 Create the database user
Create a database user such as sakim_user and generate a strong password. Keep this password private.
Example database-user step.
30 Assign the user to the database
Select the newly created user and database, then assign the required privileges. Grant only the permissions needed by the application.
Example privilege-selection step.
31 Open phpMyAdmin
After the database exists, open phpMyAdmin from cPanel to manage its tables and import an SQL backup if your application requires one.
Example database-management workflow.
32 Import the SQL file
Select the correct database, choose Import , select the application's SQL file and start the import. Confirm that the expected tables appear after completion.
Example SQL/database management visual.
33 Create the PHP connection file
In your PHP application, create a protected configuration file such as config.php . Use the exact database name and username shown in cPanel.
PHP files are transferred to the server through the file-management process.
34 Enter the database connection details
A typical mysqli connection uses the database host, username, password and database name. Many shared-hosting examples use localhost , but use the hostname specified by your hosting provider.
Example database configuration context.
35 Upload the PHP configuration
Upload the PHP application files and the protected configuration file to the server. Never place database passwords in public HTML or expose them in a test page.
Example server file-management interface.
36 Test PHP-to-MySQL
Open a controlled test page through the domain. If it fails, check the host, database name, username, password, privileges and PHP MySQL extension.
37 Open SSL/TLS tools
Return to cPanel and open SSL/TLS or SSL/TLS Certificates under Security.
Example SSL/TLS management interface.
38 Check AutoSSL
If your hosting provider enables AutoSSL, check whether a certificate has already been issued for the domain or whether an AutoSSL action is available.
AutoSSL availability depends on the host.
39 Install the certificate when required
If manual installation is required, use the provider's SSL/TLS installation controls and enter the certificate information supplied by the certificate authority.
Example SSL/TLS installation interface.
40 Open the website using HTTPS
Type https://schooldemo.com into the browser and verify that the certificate is valid for the domain.
Example certificate-management visual.
41 Enable HTTPS redirection
After HTTPS works, enable the hosting provider's Force HTTPS Redirect or equivalent setting so visitors are directed to the secure address.
42 Test every part of the website
Check the homepage, links, images, CSS, JavaScript, forms, PHP pages and database-driven functions. Look for broken resources or mixed-content warnings.
Final testing is performed in the browser.
43 Secure and clean up
Remove temporary database-test pages and unused files. Store passwords securely, keep software updated and make regular backups.
Use File Manager to remove temporary files after testing.
Final Deployment Map
    COMPUTER
       |
       v
    OPEN BROWSER
       |
       v
    HOSTING PROVIDER
       |
       v
    LOGIN TO CPANEL
       |
       +----> ADD DOMAIN ----> DNS
       |
       +----> FTP ACCOUNT ----> FILEZILLA
       |                         |
       |                         v
       |                    UPLOAD FILES
       |
       +----> DATABASE WIZARD --> MYSQL
       |                           |
       |                           v
       |                       PHPMYADMIN
       |
       +----> PHP CONFIG ------> PHP ↔ MYSQL
       |
       +----> SSL/TLS ---------> HTTPS
                                  |
                                  v
                             LIVE WEBSITE
📝 Web Hosting Exam
Each new exam selects and shuffles questions from the Web Hosting question bank, including domain, FTP, FileZilla, MySQL, PHP and SSL procedures.